Zoom Auditions: The Technical Guide to Audition-Ready Audio
Audition season is officially upon us — Hooray! — and the name of the game for 2020 is Zoom Auditions. Likely your auditions will be primarily through AuditionRoom, a new software developed by our partners at Acceptd, which is powered by Zoom.
So while you’ve been busy mastering all of that glorious audition material, we’ve been busy mastering the technical side of digital auditions. Why, you ask? So that you can too!
Zoom has made its way into some of the most important parts of our daily lives: school, work, and now your auditions! You might even feel like a Zoom professional at this point. So why should auditions be any different? Well …
Zoom is designed for business conferencing, which means that its audio is optimized to help a single voice cut through the hustle, bustle, and background noise of a busy office setting. It has the innovative ability to automatically adjust volumes based on the environment, suppress distracting background noises, and prevent overlapping sounds such as two people speaking at the same time. It’s awesome for school and work meetings, but less awesome for auditions (where the default settings are likely to suppress your power belt and mistake your piano tracks for background noise).
Fortunately, the folks at Zoom have embraced this artistic challenge, with the help of several music schools! Their most recent software update contains new audio settings that make Zoom way more audition-friendly, and we’ve put it all together for you in a handy dandy guide.
So if you’re ready to SING OUT (Louise!) and nail those auditions, follow along to get your Zoom audio settings fully optimized and audition ready!!!
Buffering …
Before we jump into discussing audio settings, there’s something else worth mentioning that’s even more important: your internet connection. That’s right! The number one thing you can do to set yourself up for a successful digital audition is to ensure that you have a reliable internet connection! We’ve all been on a spotty video call before, and we definitely don’t want that during an audition. Auditors need to see and hear you without interruption in order to get a sense of who you are and to evaluate your work. You’ve been prepping hard to nail your auditions, so don’t let choppy internet get in the way of showing off your awesome talent!
The best solution for increased speed and reliability is to connect directly via an Ethernet cable. This is the safest way to guarantee a strong connection, and it is highly recommended!
Optimizing Audio Settings Before A Call
Before you can adjust the necessary audio settings, you’ll need to make sure you have the most recent Zoom update. Once you’ve taken care of that, follow these steps to optimize your audio settings.
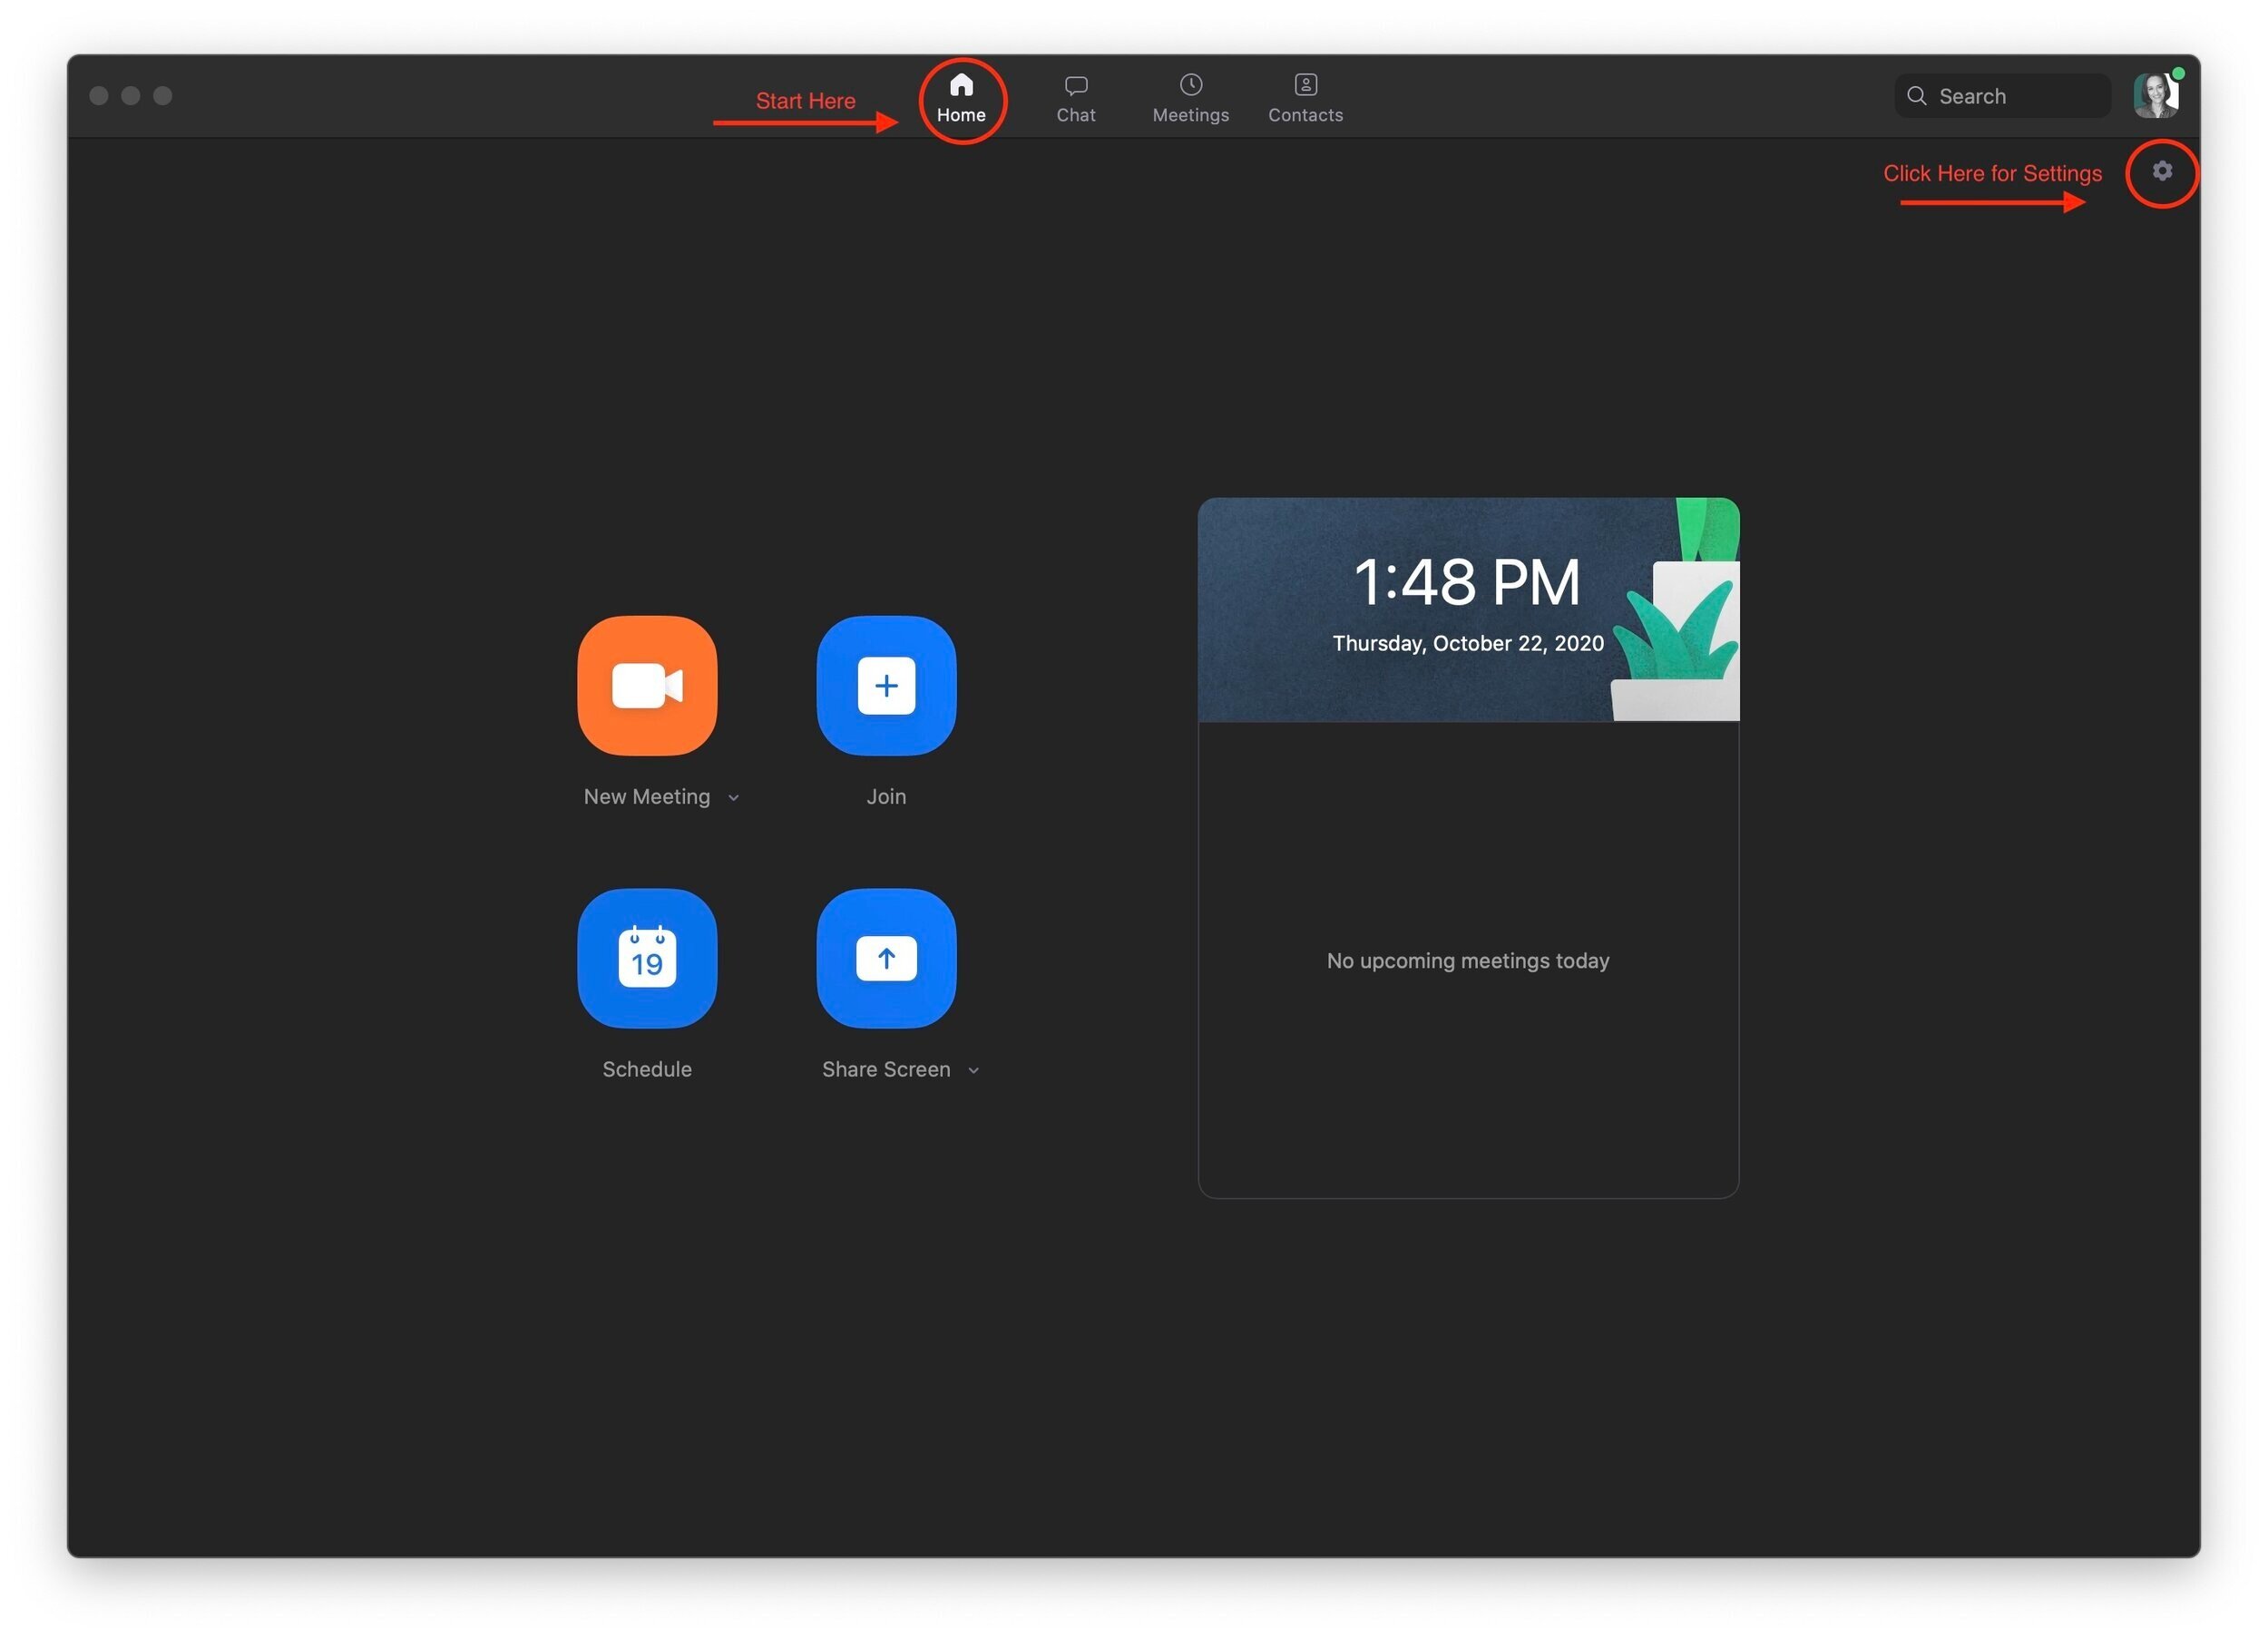
1. Open the Zoom application and head to the Home page. From there, you’ll want to click the Settings wheel in the upper right corner.
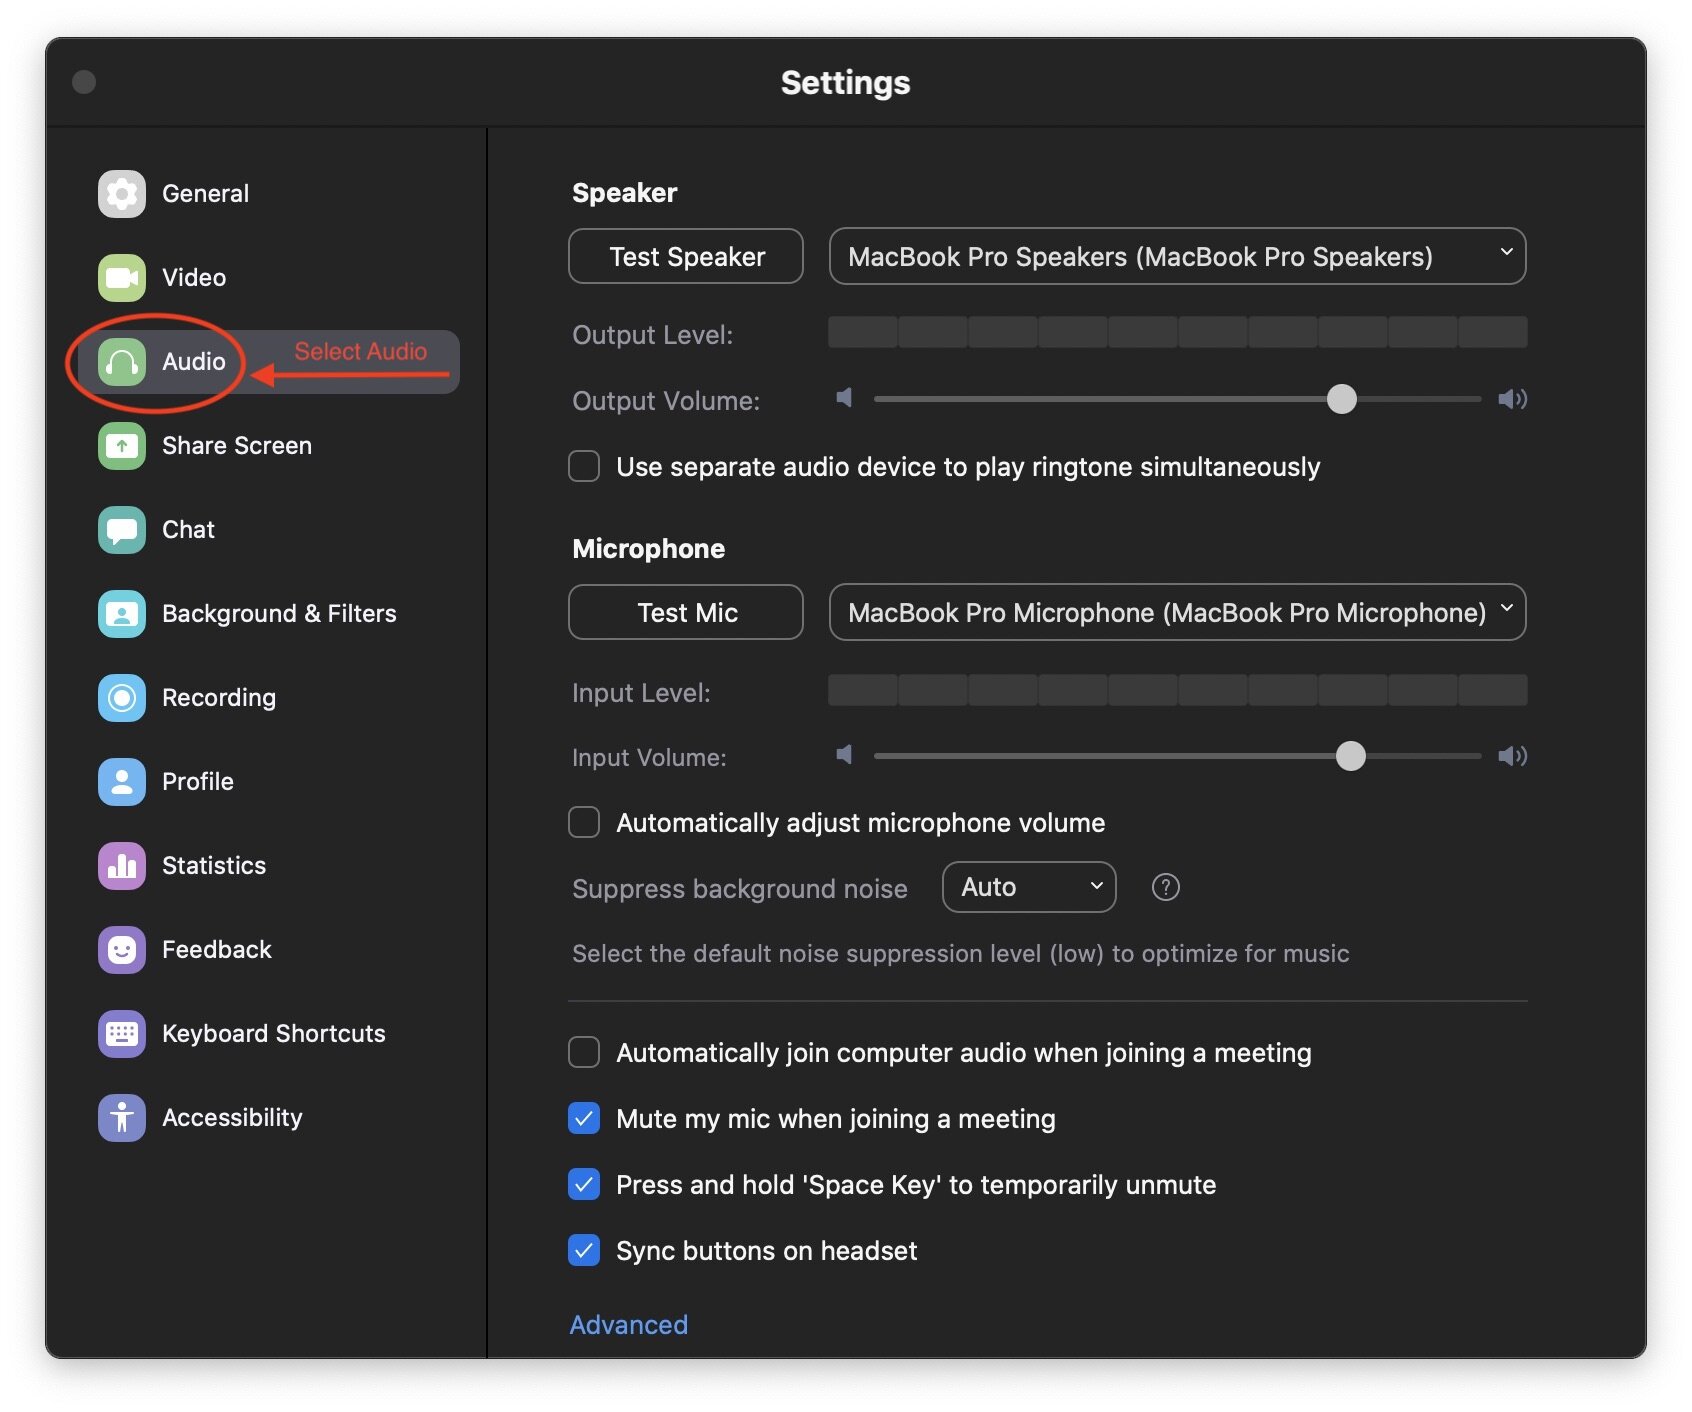
2. Select Audio from the Settings menu on the left.
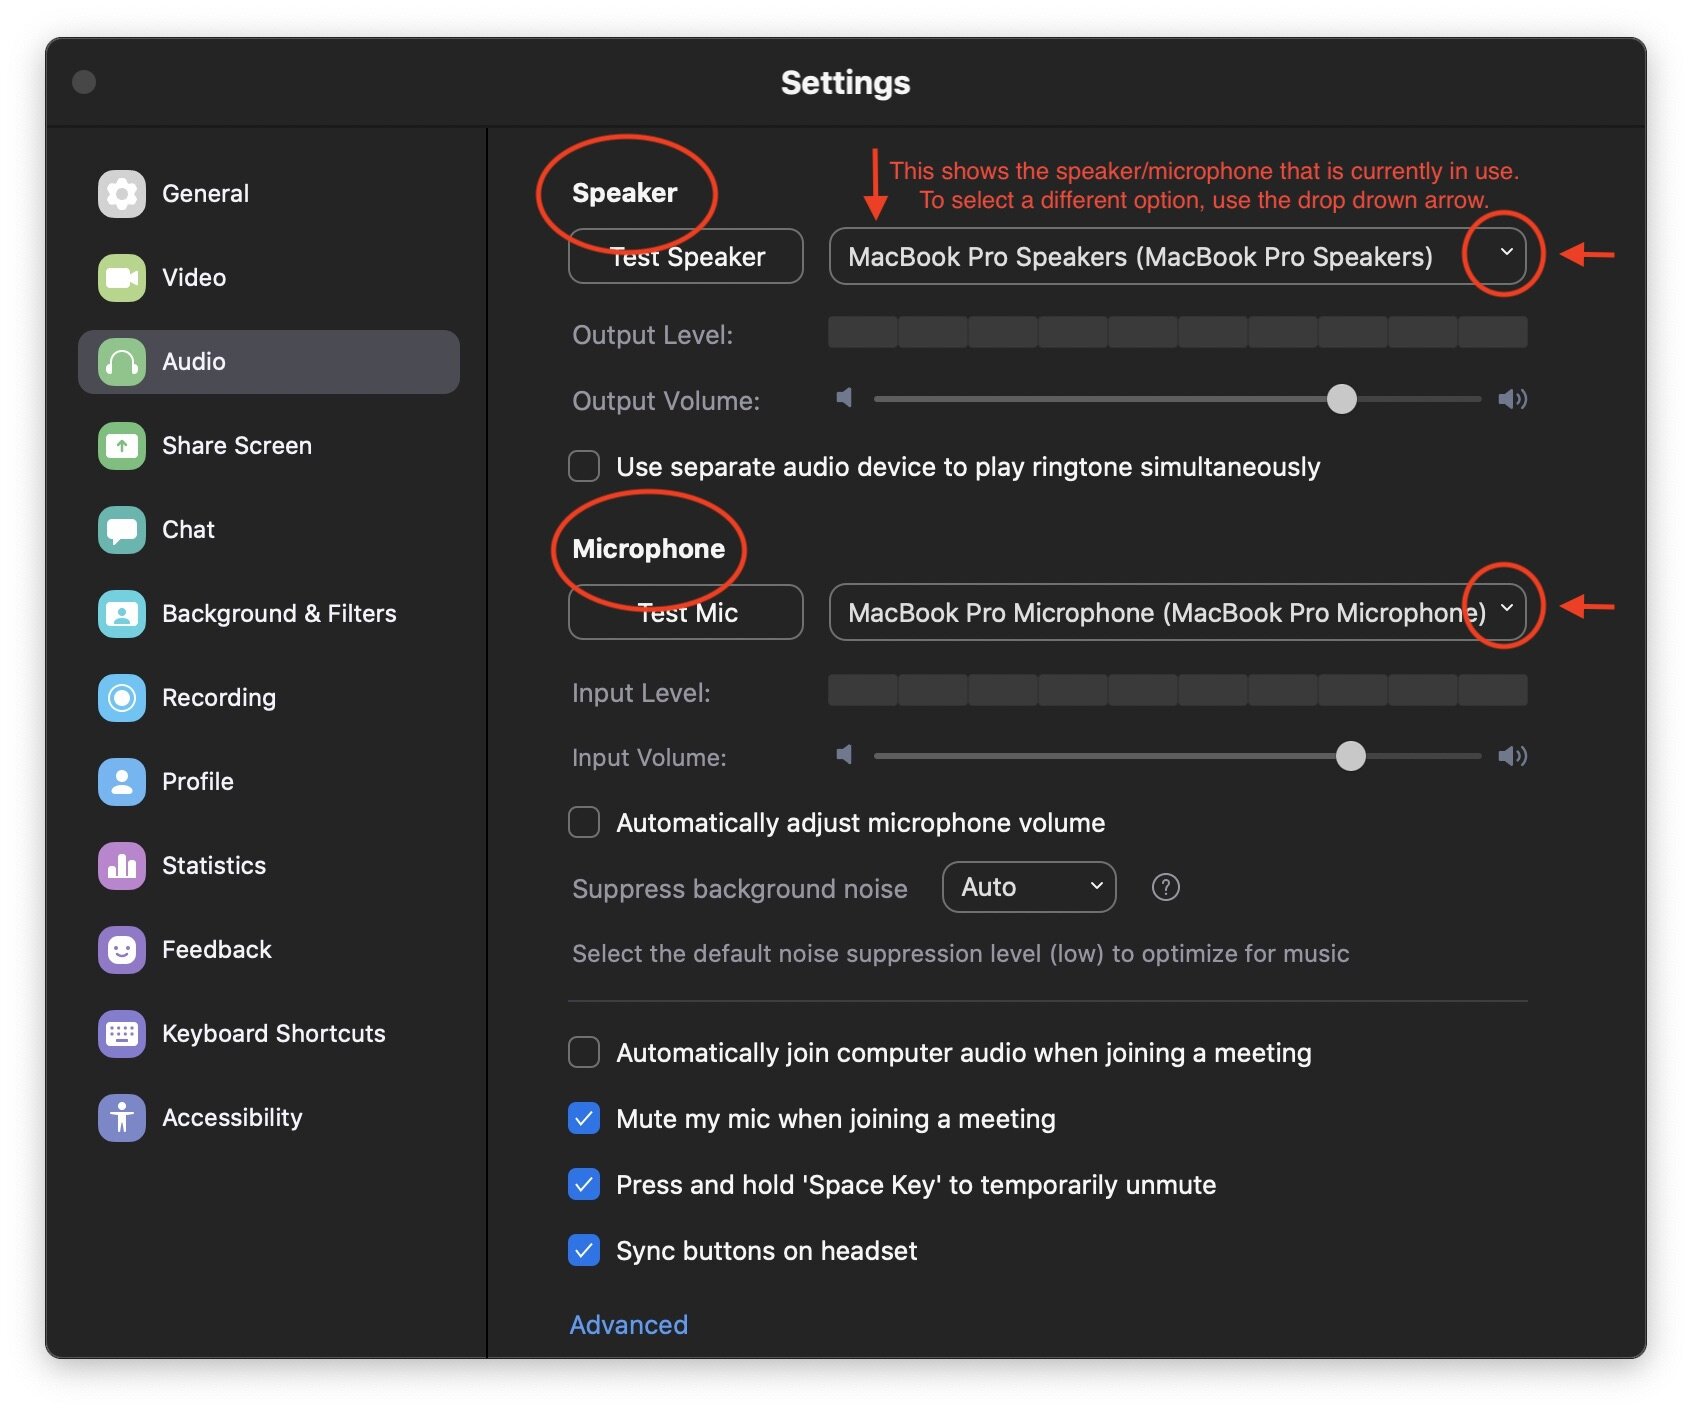
3. Select the Correct Speaker and Microphone
For most people, these will be your computer’s built-in speaker and microphone. If you are using an external microphone, you’ll need to use the drop down arrow to select the correct option.

4. Uncheck ‘Automatically adjust microphone volume.
This is one of Zoom’s default settings, and while it’s great for meetings, it’s not ideal for auditions. We definitely don’t want Zoom’s algorithms adjusting your volume while you perform! Uncheck this box so you can regain control of your mic’s volume and set the level manually.
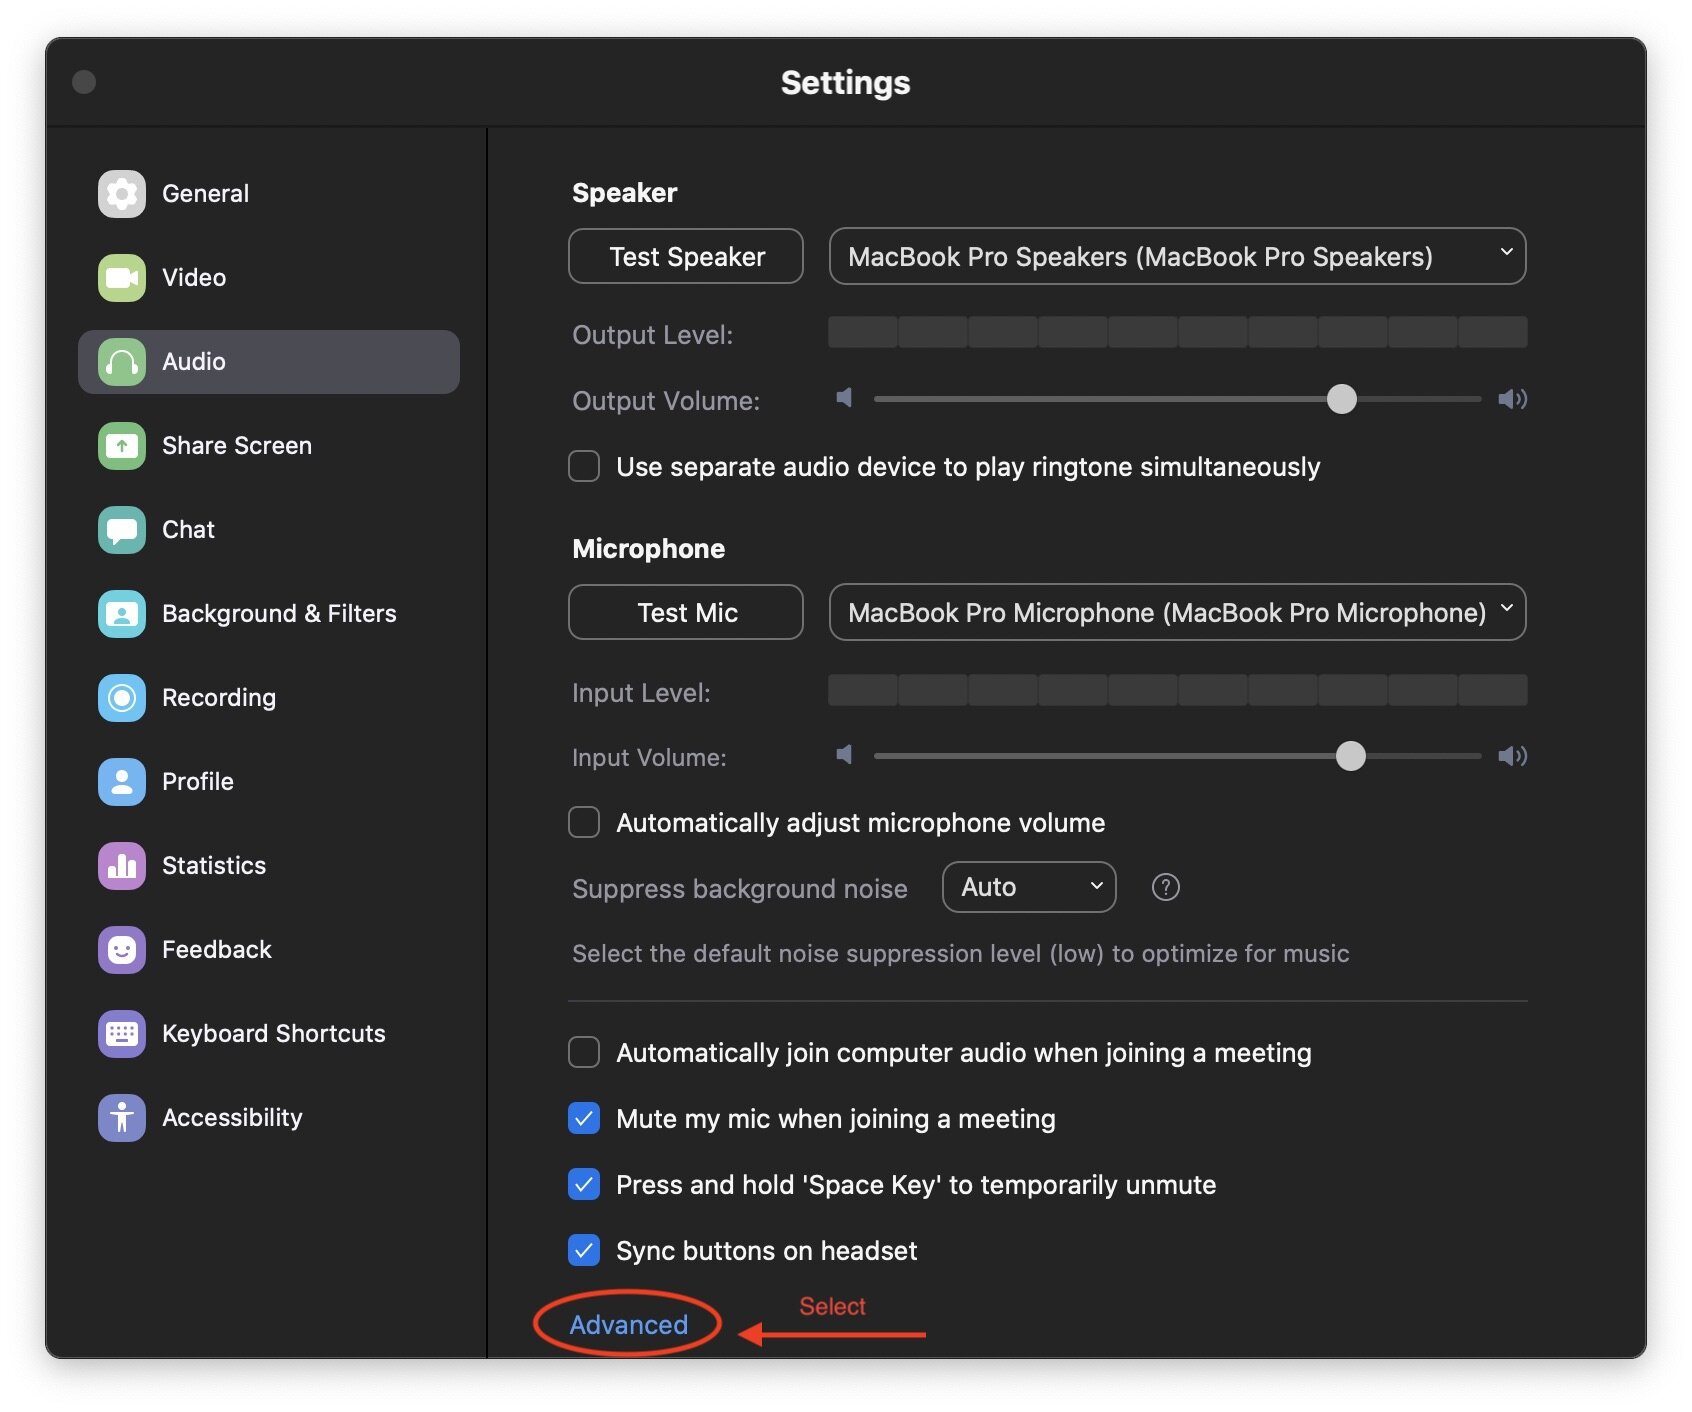
5. Select ‘Advanced’ Settings
From here we will be able to fine tune our audio settings.

6. Enable Original Sound
Check the box that says ‘Show in-meeting option to “Enable Original Sound” from microphone.’
This is the most important step, and this box should always be checked! Once this box is checked, it will give you the option to turn Original Sound on during your calls (this appears as a pop-up option in the upper left corner of your screen during calls). NOTE: You will still need to turn Original Sound on manually every time you enter a new call!
When Original Sound is not on, Zoom’s default settings and algorithms (sound compression, suppressing background noise, etc) will be in control. This not only affects your sound quality, but it can also cause Zoom to mistake your piano tracks for background noise, resulting in choppy and distorted audio.
Always make sure that Original Sound is turned on for your auditions!
Additional Audio Considerations:
Disable Echo Cancellation: Leave this box unchecked! It’s best for use with headphones, which are not recommended during your auditions.
High Fidelity Music Mode: If you’re using an external microphone*, you may want to check this option. It does improve sound quality, but it may also impact Internet connectivity. It is highly recommended that you use an Ethernet cable with this setting. If you notice slow speeds or connectivity issues, uncheck this box and stick to Original Sound only.
Use Stereo Audio: Leave this box unchecked! It’s best for use with an audio interface, which is not recommended during your auditions. It can also impact internet connectivity.
* A note about external microphones: External microphones can be a great upgrade to your personal setup, especially when it comes to reducing the feedback produced by higher frequency pitches while singing. They are also an added expense, however, and they are NOT required for you to have a great audition. Before you run out to buy a mic, test your sound! You may find you don’t need one!
If you are interested in testing out an external mic, I recommend the Pop Voice PV510+. While it’s not top of the line (you don’t need top of the line), it provides great sound quality at a very reasonable price, and it has a super long cord. It does need to be plugged in to your device, so be sure to check whether you will need any additional adaptors!
Adjusting Audio During a Call

1. When you first enter a new call, it’s likely that Zoom will ask you if you’d like to ‘Join with Computer Audio.’
This pop-up will also give you the opportunity to “Test Speak and Microphone” before you enter the call, which is always recommended. Click to be taken through a short series of automated steps. If you need to connect an external mic, this process will allow you to do so.
Once you’ve completed the test, join the call.

2. Each time you enter a call, you will need to Unmute yourself. If all of your audio settings are correct, your screen should look like this during a call.
There should be no red line across your mic icon in the bottom left, and it should turn green when you speak.
The upper left part of your screen should say “Turn off Original Sound.” NOTE: When Original Sound is on, it will read as “Turn off Original Sound.” If you see “Turn ON Original Sound,” you need to press the button again.

3. If you need to troubleshoot, adjust, or double check any audio settings during a call, you can do so by clicking the little up arrow next to the Mute icon.
Using this menu you can:
Select the correct speaker and microphone
Re/test Speaker & Microphone
Access the main menu of Audio Settings
Test for Success!
Finally, don’t forget to test, Test, TEST! While this guide is intended to set you up for success, there is no one-size-fits-all solution for the perfect home setup. There are many variables to take into consideration (room size, acoustics, internet connection, piano track volume and placement, etc), and you absolutely MUST test for success! At least a week or two before you begin auditioning, get your setup established and do some practice calls with friends, family, or teachers. Remember to test for sound and connectivity issues. If you’d like, you can even have your helpers record and share the call so you can watch it back. Make sure you’re satisfied with the quality. If not, troubleshoot, refine, and test again!
Break a Leg!
From all of us here at My College Audition, we wish you the very best digital audition experience possible. Congratulations on all of your wonderful work! Break a leg!